To screenshot a page behind a login, sign in normally in Chrome, open the page you need, and select that tab in Tab Automation. Take a Screenshot captures the page in that browser session. You do not need to copy cookies or put your password into the automation.
Start with one page. Once its PNG looks right, use For Each Link to visit a short list of private URLs in the same tab and capture each one. This works for pages your current session can open; it does not sign in for you or renew an expired session.
Test one signed-in page first
Use desktop Chrome with Tab Automation installed. Custom automations are free. Explorer access unlocks the full Dashboard used in this guide; the basic saved-results list also provides downloads and exports.
- Sign in to the website yourself, including any multi-factor prompt. Open the exact report, dashboard, or staging page you want to keep.
- Wait for the relevant charts, tables, and images to finish loading. Choose the filters or date range you want recorded.
- Open the Tab Automation side panel and choose New Automation. Under Tab & Startup, turn off Always start this automation in a new tab and select the signed-in tab.
- Choose Add Step → Take a Screenshot. Leave Full page off for the current visible area, or turn it on to include content farther down the document.
- Choose Test screenshot. This saves a separate Test result using the current screenshot settings.
- Open Dashboard → Saved results, find the Test PNG, and open its preview. Check that it shows the expected account, page, filters, and content. Choose Download to keep a copy outside the extension.
For one capture, that is enough. The test has already saved the image; you do not have to start a repeating automation. The output is PNG, and saving it in Results does not automatically download it.
Both screenshot modes use Chrome’s debugger interface, so Chrome displays a debugging notice while capture is attached. The screenshot step does not activate another tab to take its picture.
What a signed-in capture looks like
We used an unpacked test build of Tab Automation 1.0.0 with an internal demo workspace. Submitting the demo sign-in form set a session cookie; requests for Overview and Reports redirected to the sign-in page without that cookie. The screenshot step used the signed-in tab without receiving credentials or cookie values in its configuration.
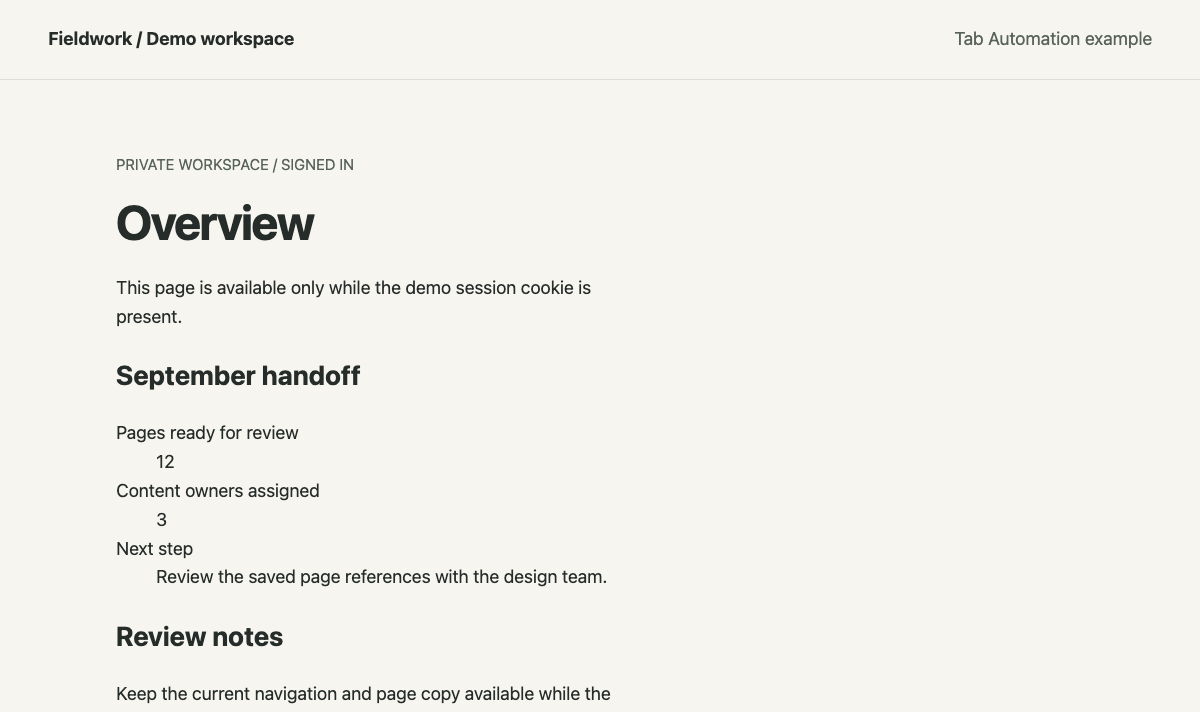
The actual exported Test screenshot. Fieldwork and its workspace figures are controlled demo data.
We then ran a two-URL list with a one-second Wait / Delay followed by Take a Screenshot inside Each Link. Full page was on and Repeat was off. The run saved two PNGs, one for each private page. Download the actual two-page ZIP.
The archive’s local URLs identify internal test pages, not a public service. This demonstrates the session and export behavior in the fixture; it does not establish compatibility with every login system or private dashboard.
See how it worksCapture a short list of private URLs
Use a fresh automation for the batch, keeping the same signed-in tab selected under Tab & Startup.
- Add For Each Link, choose Paste list, and enter two or three complete
https://orhttp://page URLs, one per line. - Inside Each Link, add Wait / Delay → Fixed before the screenshot. Start with five seconds for a page with late-loading content, then adjust after checking a sample. A fixed delay gives the page time; it does not verify that a chart is complete.
- Add Take a Screenshot inside Each Link. Choose Full page if you need the whole document. A screenshot outside the loop will not capture every listed URL.
- Open Go To This Link and choose Open beside each sample URL. Confirm that it reaches the expected private page. Navigation can reset filters that are not preserved in the URL or by the website.
- Leave Repeat off in the End block, then choose Save & Run. Keep Chrome open and leave the assigned tab to the automation.
- When the run finishes, open Dashboard → Saved results. Check the source URLs and image previews, then select the batch and choose Export… → ZIP. Keep the earlier Test image separate.
Export is unavailable while the run is running. Finish the pass, or pause it to export the files already saved. The multiple-URL screenshot guide covers list filtering, filenames, and capture recovery in more detail.
For private pages, a pasted list is the straightforward starting point. The sitemap source accepts public sitemaps; it does not authenticate to a protected sitemap using your tab’s session.
A completed screenshot can show the login page
A saved PNG proves that a page was captured, not that you were still signed in. If the website redirects an expired session to its login page, that page can become the screenshot.
In the same fixture, we cleared the demo session cookie and revisited Reports. The website redirected to sign-in. Test screenshot still saved a PNG successfully, and its source URL was the login URL.
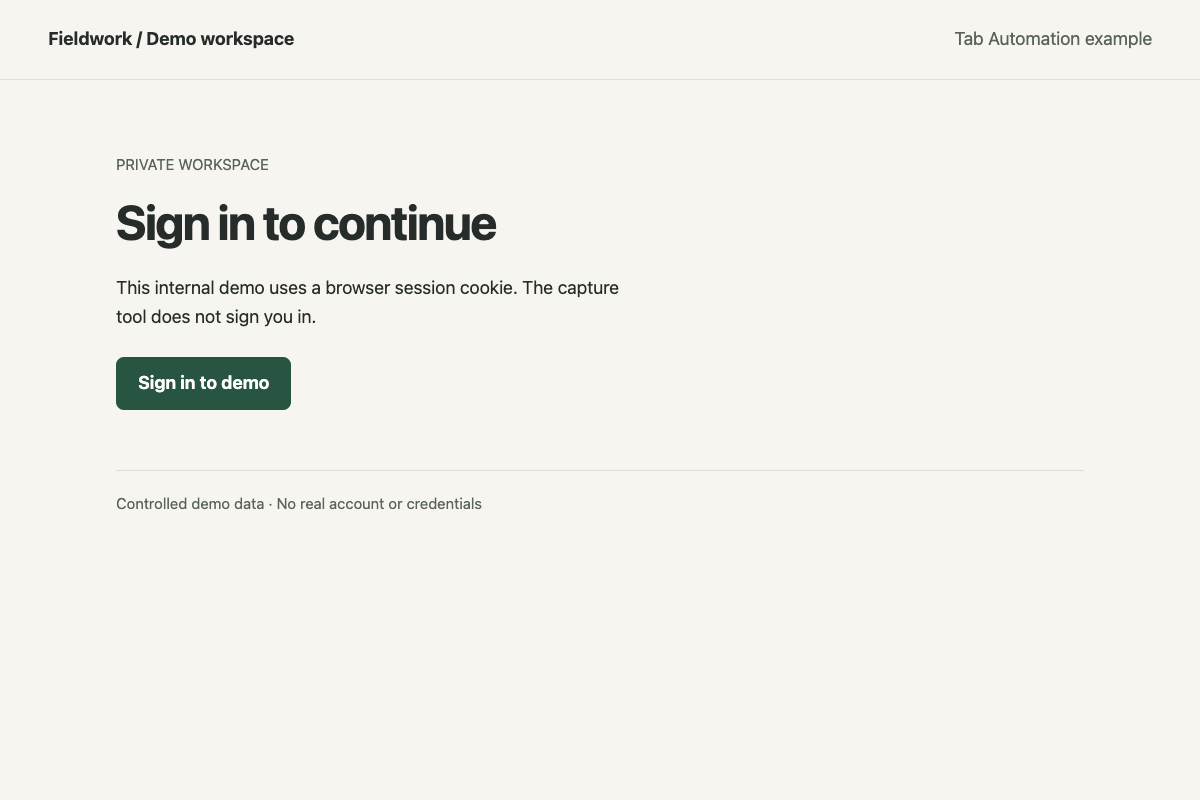
The capture succeeded, but the workspace content was no longer available. Inspect the image as well as the run status.
If this happens, pause an active run, sign in again yourself, and open an affected URL to confirm access. Make a fresh short batch containing just the pages you need to recapture. If you reuse the original automation, review Skip visited: its default Timed policy remembers visits for 24 hours. Select Never to allow revisiting remembered URLs deliberately. Leave Repeat off for one pass.
We also signed in again and verified that a new Test screenshot recorded Reports at its private URL. The automation did not perform that sign-in. Some websites display their login form without changing the address, so a source-URL check alone is insufficient.
Check the framing before sharing
Full-page capture scrolls the document to load more content, then restores its scroll position. It does not click Load more, scroll every nested dashboard panel, or reconstruct rows a virtualized table never rendered. For a scrollable chart or table panel, position the content you need and try a viewport Test screenshot.
Very long or changing pages can produce a -partial.png with a warning. Full-page output is bounded by 32 megapixels, 32,767 pixels per side, and separate 30-second loading and capture budgets. Inspect partial files individually. Take a Screenshot documents these controls and limits.
Keep Chrome open and its window unminimized while you establish that the recipe works. Some minimized windows stop producing frames and capture can time out. Review private information in the PNG before sharing it; downloading or sending a file creates a copy outside local Results.
If these captures are part of a rebuild, use the website redesign content inventory guide to keep the page’s HTML and metadata alongside its screenshot.